Fenrir - 3D Character
Production of a 3D sculpted and rigged character. From concept to final render.
Solo Project

Development
Produced during my third year of QUT for unit KNB217: Visual Storytelling: Production Design in 2025, this assignment involved the production of a 3D character from concept to final render.
For this assessment, I knew I wanted to create a character with a more exaggerated appearance and decided to use my love of wolves and werewolves as inspiration. I used a previously-created original character of mine, a supernatural werewolf named Fenrir, as a starting point before adapting his old design to something that would work better for the assignment. I wanted his build to be more top-heavy and stylised, and his appearance to be predominately black, shadowy fur, with glowing yellow to highlight parts of his body

Character Background:
Fenrir is a victim of human experimentation, a man with the ability to transform into a shadowy, monstrous, wolf-like beast after being kidnapped and tested on. After being locked in an abandoned laboratory for some time, he is freed and decides he may as well use his transformation, which has given him immense strength and power, to cause as much trouble and chaos as he can. Personality-wise Fenrir has a very devil-may-care and chaotic attitude.
Character Turnaround
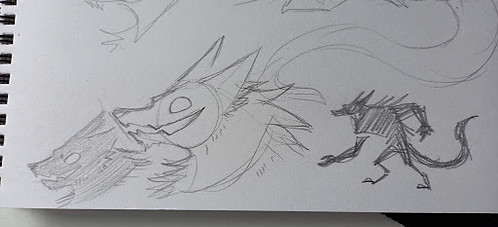
Going from Fenrir’s old design and inspiration from other media, I decided to continue using top-heavy proportions with large arms and smaller legs for an interesting silhouette. When considering shape language, I primarily used squares and triangles to give him a strong and dangerous appearance. I also knew I wanted my design to remain relatively simple, just for ease of modelling and avoiding unnecessary stress.
I started off with quick and loose sketches to decide on proportions I liked, exploring a variety of options. To keep with a stylised design, I want his fur to be solid spikes, which will also be easier to model and render compared to actual fur. I decided to give Fenrir shackles on his arms to make it clearer to the audience that he has escaped from somewhere.


Once I had a design I liked, I sketched a quick turnaround to receive feedback before creating a finalised digital one.
The final turnaround includes a front and side view along with a top view of the arms, an open mouth design, and a front view of the shackles to assist with modelling. I gave Fenrir an exaggerated underbite and jagged jaw instead of conventional teeth for a more stylised appearance. I decided to use an A-pose rather than a T-pose to account for how large his arms and shoulders are and the fact he wouldn’t be moving them over his head when posing. The turnaround angles aren’t perfect matches to each other, but I decided that would matter less as I would likely change parts of the design while sculpting as I decide what works and looks better overall in a 3D space.


Modelling & Sculpting
I modelled and sculpted starting in ZBrush. I used modified spheres to block out the rough shape of Fenrir before smoothing it together and adding details including the fur spikes and jaw. For much of my process in this assignment, I followed the exercises given in workshops, modifying them to what I needed for my character’s design.


Once blocking out was complete and the spheres were smoothed over, I added the eyelids, jaw, and fur. I found adding the stylised fur a challenge, as I had to keep going back and editing each spike because I didn’t quite like how they looked. I also found the jaw difficult as I wanted to create spikes on the outside of the jaw to mimic teeth, rather than adding conventional teeth, to keep Fenrir’s supernatural and stylised appearance. Eventually I reached something I was satisfied with and continued modelling in Maya.


Retopology & Details
Next I imported the model into Autodesk Maya and resized the model to the correct height. I found retopology difficult, especially due to the fur spikes all over Fenrir’s body. I was able to reduce the poly count from 56k to just over 10k, which I felt was low poly enough while still allowing for adequate detail. I also added the inside of Fenrir’s mouth which was a slight challenge due to the odd shape of Fenrir’s mouth with his stylised teeth.

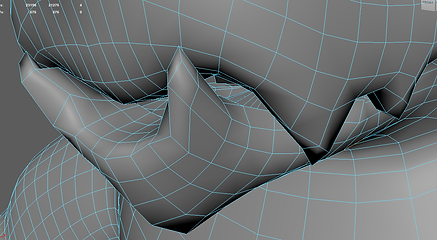

Then I cleaned up the topology, including checking for N-gons and redoing symmetry. I also added Fenrir’s tongue, which I tried to make long enough to be used for interesting poses in the second assignment. Finally I created shackles for Fenrir’s arms. They are slightly different on each side to add a little more detail to his model and help suggest that he was locked up for some time.


UV Unwrapping
Finally I UV unwrapped the model. I found it difficult to get rid of texture distortions due to the fur spikes and unconventional face shape. While I was able to avoid any significant distortion, I hope that Fenrir being primarily a dark colour when textured will help to hide any distortion remaining. I also UV unwrapped the eyes, tongue, and shackles and added them plus the main body to one UV map.


Texturing
I found texturing in Substance Painter difficult due to trying to find the exact right texture for Fenrir that worked as a mix between shadow and fur. I did have some trouble with blurring layers due to it bleeding onto other parts of the UV, which is something I don’t have the time to go back and properly fix so I did my best to remove any mistakes as I went and will keep this issue in mind for the future. The shackles were the simplest part, being a metallic dark grey.


Emissive textures helped me get the appearance I wanted for the yellow limbs. As stated before, I wanted to emphasise the supernatural appearance of Fenrir and I think that the strong glow helps to achieve that. Fortunately the gradients aren’t very noticeable across the seams of the limbs, hidden further by them being under the arms and inside the legs.

Blend Shapes & Rigging
I used Autodesk’s soft selection and sculpting tools to create each blend shape. Fenrir having both an animal-like face along with having external teeth-like shapes along the lip made it more difficult to achieve certain face shapes, especially shapes related to the lips. Fenrir being a solid black also makes it harder to see more subtle changes in his facial expressions.


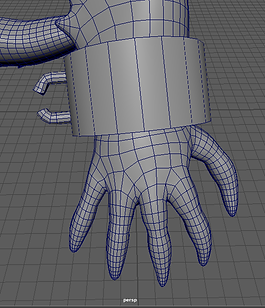
Next I rigged Fenrir using Maya’s HumanIK Rig. I struggled slightly with placing the bones on Fenrir’s more exaggerated body including his large hands and wide neck. I also had some difficulty adding the extra bone to the legs to match Fenrir’s digitigrade legs and bones for the ears. I decided to rig the ears as I thought posing them would be good for adding to Fenrir’s emotions where his facial expressions may be difficult to see, as well as matching how animals use their ears to show emotion.


Control Rig and Skin Weighting
I used the plugin ngSkinTools to assist with painting skin weights as I found it far easier to use than Maya’s inbuilt tools. For painting I started on the outer parts of my body before moving inward (e.g. from the tips of the fingers, to the wrist, elbow, shoulder, chest). I had issues with the weight painting caused by Fenrir’s wide build leading to a lot of deformities in the chest when the arms moved that I found difficult to fix, likely made worse by my lack of experience in skin weight painting.
The model has a lack of flexibility in parts of the body, for example bending backwards, but this was something I anticipated and accepted when initially designing Fenrir and I think makes sense considering the build of the character anyway. I also added controllers for the jaw, eyes, ears, a spline for the tail, and a blend controller for the face.


Posing and Rendering
When posing, my main goal was to display Fenrir’s personality and build in an appealing composition. I did this through him having his mouth open wide, eyebrows down, and hunched over to show his size, strength, and fierceness. While posing, I realized that I had messed up either the modelling or blendshapes of the mouth and Fenrir was unable to smile in the way I envisioned. Unfortunately, I had no time to go back to find and fix the issue so I had to accept it how it was.
I chose a darker and warmer HDR environment to emphasise the glow on the model and to make Fenrir feel more dangerous. The darker background also works with his more shadowy and supernatural appearance and textures. I made a lot of little tweaks to the pose and lighting to create a clear and appealing silhouette that showed off Fenrir’s ears, snout and mouth, hands, and tail clearly.


Reflection
In hindsight, choosing to model and rig a character with more exaggerated and nonhuman proportions made certain steps of the pipeline more difficult for me than they could have been had I chosen a different character. Despite this, I enjoyed the experience and I’m still happy with the character I chose to produce and the outcome of this assignment. I definitely made mistakes in both my first assignment and this one, for example my topology and blendshapes had issues that I simply did not have the time to go back and fix considering changing these things would cause a cascading chain of necessary changes that would have taken up significant time to fix that I simply did not have.
Overall, I am happy with my work on this assignment, especially considering it was my first time completing a full 3D character production pipeline. While there are issues with my model in a few areas, I can learn from these mistakes and I’m still pleased with how Fenrir turned out. As said in my last assignment, while I don’t have a lot of interest in working in 3D character creation myself, as an aspiring game designer this class has given me significant insight and understanding of the process that may assist me in the future.